
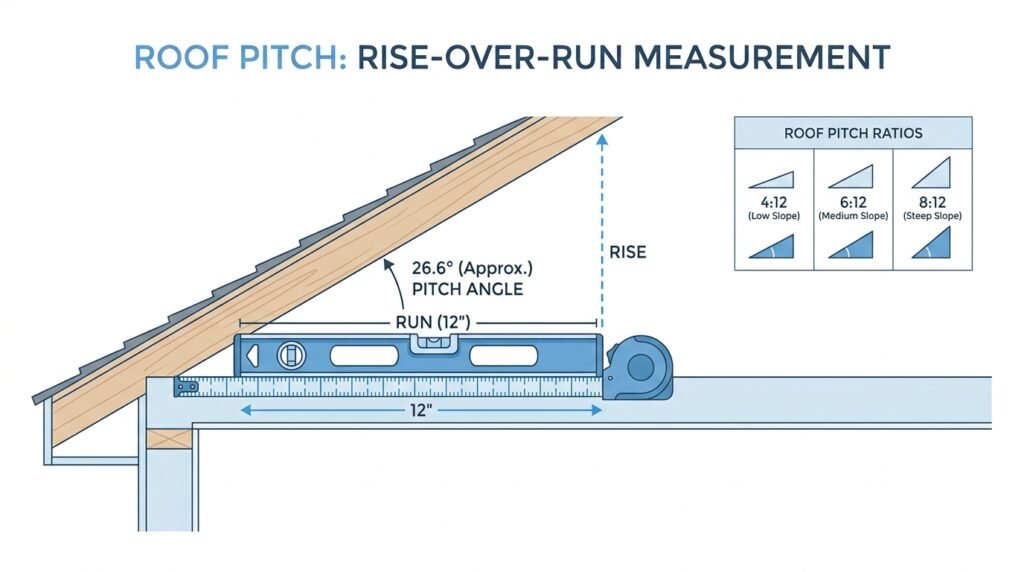
If you’re planning a roofing project, buying materials, or just curious about your home’s design, knowing how to calculate roof pitch is essential. Roof pitch determines everything from the type of shingles you can use to how well your roof sheds rain and snow. The good news? You don’t need to be a contractor to figure it out. With a tape measure, a level, and a simple formula, you can calculate your roof’s pitch in about ten minutes. This guide walks you through the exact formula, common ratios, conversion charts, and step-by-step measuring methods.
What Is Roof Pitch?
Roof pitch (also called roof slope) describes how steep a roof is. It’s expressed as a ratio of vertical rise to horizontal run, most commonly written as “X:12” — meaning the roof rises X inches for every 12 horizontal inches.
For example, a 6:12 roof pitch rises 6 inches for every 12 inches it runs horizontally. The higher the first number, the steeper the roof.
Roof pitch isn’t just a design detail — it affects:
- Water and snow drainage
- Material compatibility (shingles, metal, tile)
- Attic space and ventilation
- Wind resistance
- Overall construction cost
Roof Pitch Formula Explained
The Basic Rise-Over-Run Formula
The core roof pitch formula is simple:
Roof Pitch = Rise ÷ Run
Where:
- Rise = the vertical height the roof climbs over a horizontal distance
- Run = a fixed horizontal distance, typically 12 inches (1 foot)
So if your roof rises 8 inches over a 12-inch run, your pitch is written as 8:12 (read “eight-twelve” or “eight-in-twelve”).
How to Measure Rise and Run
To use this formula accurately, you need two real-world measurements:
- Run — always measured as a fixed horizontal distance (usually 12 inches for simplicity).
- Rise — the vertical distance the roof climbs over that same 12-inch run.
You can gather these numbers either inside the attic or outside on a ladder — we’ll cover both methods below.
Roof Pitch Ratios Explained
Common Roof Pitch Ratios
Most residential roofs fall between 4:12 and 9:12. Here’s what different ratios typically indicate:
| Pitch Ratio | Slope Type | Common Use |
|---|---|---|
| 2:12 – 3:12 | Low slope | Modern/minimalist homes |
| 4:12 – 6:12 | Standard slope | Most traditional homes |
| 7:12 – 9:12 | Steep slope | Cottage, colonial styles |
| 10:12 – 12:12 | Very steep | A-frame, chalet-style homes |
Low-Slope vs. Steep-Slope Roofs
- Low-slope roofs (under 4:12) drain slower and often require specialized waterproof membranes instead of standard shingles.
- Steep-slope roofs (above 7:12) shed water and snow quickly but cost more to build due to increased material and labor needs.
Knowing where your roof falls on this scale helps you choose the right materials and anticipate maintenance needs.
How to Calculate Roof Pitch Step by Step
Method 1: Measuring From the Attic
This is the most accurate method since you’re working with exposed rafters.
- Take a torpedo level and a tape measure into your attic.
- Hold the level horizontally against the underside of a rafter.
- Measure exactly 12 inches out from one end of the level.
- At that 12-inch mark, measure straight down (vertically) to the rafter’s surface.
- That vertical measurement is your rise. Your run is the 12 inches you measured.
- Express it as rise:12 — for example, if the rise is 5 inches, your roof pitch is 5:12.
Method 2: Measuring From Outside
If you don’t have attic access, you can measure from a ladder along the gable end (the triangular wall section):
- Place a level horizontally against the roof’s underside or fascia.
- Mark a 12-inch point along the level.
- Measure the vertical distance from that mark up to the roof surface.
- That’s your rise over a 12-inch run — same formula as above.
Safety tip: Always have someone spot your ladder, and avoid this method on wet or windy days.
Using a Speed Square or Level
A speed square (carpenter’s square) has a built-in pitch scale, making this even faster:
- Place the square’s pivot point against the rafter edge.
- Align the base with the rafter.
- Read the pitch directly off the angle scale — no separate rise/run measuring needed.
This tool is popular among roofers because it converts angle and pitch instantly.
Roof Pitch to Angle Conversion
Sometimes you need the pitch expressed as a degree angle rather than a ratio — useful for framing calculations or solar panel installation.
Formula: Angle = arctangent (Rise ÷ Run)
Roof Pitch Angle Chart
| Pitch (X:12) | Angle (Degrees) | Slope % |
|---|---|---|
| 2:12 | 9.5° | 16.7% |
| 4:12 | 18.4° | 33.3% |
| 6:12 | 26.6° | 50% |
| 8:12 | 33.7° | 66.7% |
| 10:12 | 39.8° | 83.3% |
| 12:12 | 45° | 100% |
This chart is handy for quickly cross-referencing pitch, angle, and slope percentage without doing trigonometry by hand.
Roof Pitch Chart: Ratio, Multiplier & Area
When estimating materials, roofers use a pitch multiplier to calculate actual roof surface area (since a sloped roof has more surface area than its flat footprint).
| Pitch | Multiplier |
|---|---|
| 3:12 | 1.03 |
| 4:12 | 1.054 |
| 5:12 | 1.083 |
| 6:12 | 1.118 |
| 8:12 | 1.202 |
| 10:12 | 1.302 |
| 12:12 | 1.414 |
Formula: Actual Roof Area = Flat Roof Area × Pitch Multiplier
For example, a 1,500 sq ft flat footprint with a 6:12 pitch equals roughly 1,677 sq ft of actual roofing material needed.
Why Roof Pitch Matters
Material Choice
Steeper roofs can use lightweight materials like asphalt shingles or wood shakes, while low-slope roofs typically require membrane roofing, built-up roofing (BUR), or metal panels to prevent leaks.
Drainage and Climate
In regions with heavy snowfall or rainfall, steeper pitches (6:12 and above) are preferred because they shed precipitation faster, reducing the risk of pooling or ice dams.
Cost Implications
Steeper roofs require more materials, additional safety equipment, and more labor time — all of which increase overall roofing costs. A low-slope roof may be cheaper to build but often costs more long-term in waterproofing maintenance.
Common Mistakes When Calculating Roof Pitch
- Using an unfixed run distance. Always use 12 inches as your run for standard comparisons.
- Measuring on an uneven or sagging rafter, which skews the rise measurement.
- Confusing slope percentage with pitch ratio — they’re related but calculated differently.
- Not accounting for the pitch multiplier when estimating material quantities, leading to under-ordering shingles or panels.
Conclusion
Calculating roof pitch doesn’t require special expertise — just a level, a tape measure, and the rise-over-run formula. Whether you’re planning a renovation, ordering materials, or simply understanding your home’s architecture, knowing your roof’s pitch ratio, angle, and material multiplier puts you in control of the project. Use the charts above as a quick reference anytime you need to convert between ratios, angles, and slope percentages.
Frequently Asked Questions (FAQ)
1. What is a good roof pitch for a house?
Most residential homes use a pitch between 4:12 and 9:12, balancing water drainage, cost, and aesthetics.
2. How do I calculate roof pitch without going into the attic?
Use a level and tape measure along the gable end from a ladder, measuring rise over a fixed 12-inch run — no attic access required.
3. What does a 4:12 roof pitch mean?
It means the roof rises 4 inches vertically for every 12 inches of horizontal run, equal to about an 18.4-degree angle.
4. How does roof pitch affect roofing cost?
Steeper pitches require more materials and labor due to increased surface area and safety precautions, generally raising overall project costs.